Sunday, December 31, 2006

Dress Ornaments Tutorial

Materials:
Fancy Fabrics for Bodice & Skirt
Scrap of Cotton closely matching color of Bodice fabric
Lace overlay for skirt (optional)
Trim for waist, skirt hem and bodice top
ribbon for straps
~20g wire for hanger
buttons, beads, rosebuds or other decorations

Enlarge the pattern (see below)to the correct size (note the tape measure along the bottom of the skirt)
All pattern pieces include a quarter inch seam allowance (the seam allowances are roughly sketched in).
Cut one skirt from fancy fabric on the fold. If desired, cut 1 skirt from lace for an overlay (on the fold).
Cut 2 bodice pieces from fancy fabric. Cut 2 bodice facings from cotton fabric.

Bodice Assembly
Right sides together, pin bodice facing to top edge of bodice. Stitch together using a ¼ inch seam allowance and repeat for other bodice/facing pair.
Trim this seam to 1/8 inch. Turn right side out and press.
Place right sides of two bodices together and pin side seams. Stitch each side seams using a ¼ inch seam allowance. Clip curves; turn right side out and press. If your fabric ravels easily, zigzag bottom edge of bodice.

Skirt Assembly
Press under ¼ inch on one long edge of skirt for hem. Turn under again, press and stitch hem by machine. This stitching will be covered either by your trim or by your lace overlay.

Without a lace (skirt) overlay:
At this point, you need to decide if you will stitch your skirt trim into the seam allowance or if you will overlap the trim after the skirt's center back seam is sewn.
-If you are using a thick trim, attach trim to hem leaving trim un-attached an inch from the skirt's center back seam. Stitch center back seam in skirt; press seam open. Overlap the trim over this seam and secure to skirt by hand or machine.
-If you are using lace trim, or a thin trim, stitch the lace or trim along the bottom edge of the skirt. Then stitch the center back seam in the skirt (using ¼ inch seam allowance) and press the seam open.

With a lace (skirt) overlay:
Press under ¼ inch on one long edge of lace overlay for hem. If lace tends to ravel, turn under again and press. Stitch hem by machine. Typically a light trim is used on the lace overlay, one that can be stitched into the overlay's seam allowance. Stitch the trim along the bottom edge of the lace overlay.
Lay the skirt right side up on a flat surface. Place the overlay on top of it, right side up. Pin the bottom edge of the lace overlay to the bottom edge of your skirt, to keep them aligned as desired. If the top edges are uneven, trim them to match. Baste lace overlay to skirt along top edge. Pin the center back seam of the skirt, so all four layers of fabric are secure. Stitch the center back seam in the skirt (using ¼ inch seam allowance) and press the seam open.


Stitching Bodice to Skirt
Using pins or a disappearing marker, mark the center front and two sides of the skirt. Gather the top edge of the skirt by hand or machine. Right sides together, pin the gathered edge of the skirt to the bodice, centering the skirt back seam on one of the bodice pieces, centering the skirt front on the other bodice piece and matching the skirt sides to the bodice side seams. This is a tough seam to stitch, because it is so small. I typically began my stitching where there was the least amount of bulk, often stitching only 5 or 6 stitches at a time, stopping and bringing more fabric around the machine to the front.

Decoration & straps
Now comes the fun part. Trim can be hand-stitched around the waist or along the top edge of the bodice, or both. I sometimes added a flower button, ribbon rose or bead near the waist or at the center top of the bodice. I like to use organdy ribbon for the straps, but any type of narrow ribbon works fine. Cut two lengths of ribbon for the straps, each about 2 inches long. Eyeball their position so they are even and tack or glue them to the inside top of the bodice front and back. Once the straps are secure, I closed up the top bodice area - I have to admit, I used glue here. The type of hanger I made slips easily into the straps for hanging. If you wanted to get fancier, you could place beads on the wire before bending it into a hanger shape. Enjoy!

P.S. One of Susan’s friends suggested putting potpourri into the skirt and sewing it closed to make a dress sachet – this is a great idea.


Monday, December 25, 2006

A Creative Daughter

This was presented to me by my just-turned-14 year old daughter for Christmas. She carved it out of wood, painted it and decorated it with pipe cleaners. I was blown away by her creativity, her planning, her painting and just loooove those whiskers. Just had to share it....

Tuesday, December 19, 2006

Christmas Party

Pictured is one of my little Christmas vignettes that I like to put together. We make an ornament wreath like this every year for the church Boutique as one of our opportunity drawing prizes. (It's missing one ball on the right - it fell off in transit.) The JOY boxes were a project featured on Carol Duvall awhile back.

Well the dust has cleared and the party is over and it was great fun! We had lots of good food, good talk, loud laughter and a great time. A few people cancelled out at the last minute, but that was OK as it was just smaller and more intimate. We did an ornament swap where everyone brings a wrapped ornament and picks a number. When it's your turn, you can either steal an ornament from someone who's gone before you, or open a new one. Stealing frequently starts a domino effect and it can get downright hilarious. One of the guests, our pastor's wife, was too shy the first two years she came to ever steal from someone else. But we taught her well and now she has no qualms about stealing - even from the hostess! (much to my chagrin) There was general outrage when we discovered that 3 of the people who came were going home with the very ornaments that they brought! There were many beautiful, glamourous, cute and sparkly ornaments. The last one to be opened was a sock monkey ornament, which caused a big stir. Since all the trading and stealing was done, there was some last-minute desperate bargaining to get the sock monkey!

The real funny thing is, we all know it's not about the ornaments, but we act like it is for an hour or so and get pretty goofy. Well the last guest left at 3 am, so it's taken me a few days to catch up on sleep and wash those wine glasses.

Everyone loved their dress ornaments - my neighbor asked "Did you REALLY make these?". I'd like to post directions and the pattern for those, but am not sure how to post the pattern so it's actual size or so I can give exact enlargement directions. I suppose I could post the pattern with measurements along-side... Anyone have any clues for me on this?

Happy Stitching....

Monday, December 11, 2006

One Size Fits All


I have been busy making my dress ornaments and having fun with sequins, trim, buttons, lace and ribbon. The cool thing is I have some trims I didn't realize I have that would be just perfect for Crazy Quilting! Here are some of my "dresses" - I wish they all fit!

Monday, December 04, 2006

Christmas Invitations


Here are a few more samples of some Christmas invitations I have made.

This one has a tricky background - I laid lace on top of a rectangle of that super-sticky tape. Then I sprinkled on the gold glitter, the lace acting as a stencil. Then I removed the lace, which left all the flowers blank. Pour on the red glitter and presto! your lace pattern is reproduced in glitter! I really like texture, so for the holly leaves I used three different materials.
For the blue invitation, I cut a triangle of cardboard for the tree and then wrapped it with a chenille yarn that has silver in it. The star is made of glass and I used a silver metallic pen around the edges of it. The curve at the bottom let me experiement with a "glue pen". You just draw what you want and then add glitter - it works very well.

Sunday, December 03, 2006

Etsy Plug

Another Oriental Button to share....

I was listening to National Public Radio this morning and they were interviewing a woman who has a blog directing people to different websites for unusual gifts. They asked her for an example and she talked a little about Etsy. So maybe those of you with Etsy sites will see a little more activity come your way.

Christmas Decorations


Here's a picture of an angel ornament I made for our church boutique. If I hadn't had to make twelve of them, I would have stitched on the beads, but in this picture the beads are glued on.


Also, here's a tree I made last year as a Christmas decoration. Can you tell purple is my favorite color?

Saturday, December 02, 2006

Handmade Christmas Cards

There's been some talk of the fun of making your own holiday cards. Here are two pix of some invitations/Christmas Cards I have made.

For the first one, I used handmade paper, stamped the reindeer and snowflakes and embossed them. I used gold metallic luster rub-on to color in the reindeer. There's snowy glitter on the edges of the green trees and gold mini-glitter all over the card, but it doesn't show up well in the picture. The red tree was bought from a rubber stamp store and stands up a little from the green ones.


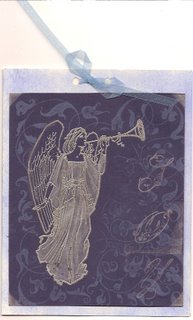
(I seem to like blue.) For this one, I did direct-to-paper around the edges of a cream-colored card, then added the dark blue cardstock on top. I used an Anna Griffin stamp in light blue ink for the all-over pattern behind the angel. The angel is stamped and embossed, then colored in using silver metallic luster rub-on. I gave each corner a little silver corner. The "O" in JOY (also Anna Griffin letters) in this one is not stamped very well, since this was the one I kept, it wasn't good enough to send out.