Monday, October 30, 2006

Another Enamel Button


Here is another button for you to enjoy. I don't know when I will be able to get back to stitching CQ - things are so busy. Our church boutique is Nov 11, my daughter's birthday is the 12th, I have company coming and staying for several days on the 9th, and I can't wait to get a needle in my hand instead of a glue gun. I don't mind making things that come out really nicely, but now I am working on some cutsie-pie snowmen....and I'm not really a cutesie-pie person. I'd much rather make something victorian or sophisticated or just beautiful.

Saturday, October 28, 2006

UFO CQ Seam

Here's a seam treatment from a UFO I found in my sewing room. I don't know how I got my stitches so even. The basting stitches indicate this was supposed to be a purse, but I don't remember a thing about it. I like the combination of blues, turquoise and purple (my favorite color too, Pat W.) but can't figure out why I added in a maroon. Do you ever find UFOs and you don't even like the colors or style you chose? Maybe that's why it's a UFO. Sometimes I find something I made 10 years ago and think "how did I do that? - I couldn't do that today" - almost as if someone snuck into my room and hid their UFOs. That's it, there are evil (or creative) ufo elves, sneaking up on us.

not really paranoid in LA,
LinMoon

Tuesday, October 24, 2006

Victorian Boot

This is a companion piece to the fan pincushion. This is a needlecase, with wool felt "pages" inside to hold needles. The victorian boot is also a good motif for a crazy quilt.

If you look closely, you might see that these silk ribbon roses "stand up tall". That is because they are Beaded Spiderweb Roses. When you stitch the spiderweb foundation, you do so over a Mill Hill Pebble bead. A pebble bead is a little bigger than an E bead and has a nice big hole in the center so you can fit a large chenille needle thru it when you get to the silk ribbon portion of the rose. I like the effect.

Fan Pincushion

This is an old-fashioned pincushion I made with silk ribbon embroidery. It's old-fashioned because it's made to have the pins stuck into the top curved edge. It's made with several pieces of felt sandwiched between 2 fabric-covered cardboards.

This could easily translate into a motif used in a crazy quilt. Some motifs are appliqued onto the CQ, then embroidered. Whenever I do this, I sew the desired shape right sides together to a piece of non-woven interfacing. I sew around all the edges, not leaving any opening for turning. I then slit the back of the interfacing, turn the motif right side out and press. This way you get a good shape, without the usual bulge where the opening for turning was located. If you want to get really clever, you can stitch your motif to fusible interfacing (right side of motif to non-fusible side of interfacing). Then after you slit and turn the motif, you can place it on the CQ and iron it on. But you have to use a special non-stick sheet on your ironing board, or when you are pressing it into shape, you'll iron it onto your ironing board!

Monday, October 23, 2006

CQ Kimono seams


I've been working a few more seams on my CQ kimono. As it gets closer to being completed, the seams to embellish are very short. So my embellishments are nothing to write home about - not enough room to go hog wild. I'm looking forward to the next project where I will have more room to embellish.


Thursday, October 19, 2006

More Beaded Cameos

Here are a few more beaded cameos I have made. The flower cameo I found in downtown LA in the bead district. It was the only one or two left and was discolored because it was so old. I had to soak it in oxy and scrub the big rose with a toothbrush to get it clean. It is sort of an odd blue to try to match with beads. I usually try to place the flower spray farthest from what I would consider the most interesting part of the cameo. That's why the flower cameo ended up with its flower spray on the bottom, instead of off to the side.


I neglected to answer the question before (sorry about that) asking me where where I get my suede or ultrasuede. One of the best purchases I ever made was at a thrift shop. I bought a white leather skirt, which was discolored on the front in a few spots. But the back of it was fine. I have cut that thing up so many times. Especially when I needed a weird color, I would just color it with a sharpie- just for small projects like this.

Tuesday, October 17, 2006

I'm back with another CQ seam

Here is the latest seam on my CQ kimono. The fabric on the top was my mom's - it's a chirimen(sp?) silk - just lovely; I only have a few scraps of it left.
Well, I was gone to my niece's wedding in South Carolina - where Southern Hospitality is alive and well. Everyone there was so nice - our family made up about 5% of all the people at the rehearsal dinner and wedding reception, so we were always sitting with people we didn't know (my brother and I). I hate those times when you sit at a table with strangers who aren't the least bit interested in talking to others. But this wasn't like that at all and it was loads of fun. Hope you've been happily stitching away....

Wednesday, October 11, 2006

Away Message

Just a short note to say that I will not have access to a computer for the next few days. Will be back online around the 16th or 17th.

Happy Stitching!

Tuesday, October 10, 2006

More CQ seams

Well here's another seam I have been working on. I don't know why I keep ending up with red and green - this is a kimono, not a Christmas stocking! Oh, well, it was fun...

I just have 3 or four more seams to go until I can sew it together and it will be done! Yay! But then what will I work on? I have way too many ideas floating around in my head....

Saturday, October 07, 2006

A few more buttons


Here is another button picture, along with another way to display buttons. Since I have so many buttons (I used to collect them) and they used to just sit in a box in the closet, I wanted them out where I could see them. I used a shadowbox frame - it's about an inch and a half deep. The buttons are mounted on cardboard, which is covered with batting, then fabric. I stitch back and forth thru the fabric edges on the back to make it nice and tight all around. I use an awl to punch a hole thru the fabric, batting and cardboard, insert the button shank, then wrap a pipe cleaner or telephone wire thru the shank, spreading out the ends to secure the button in its place.

Beaded Cameo Pin Tutorial


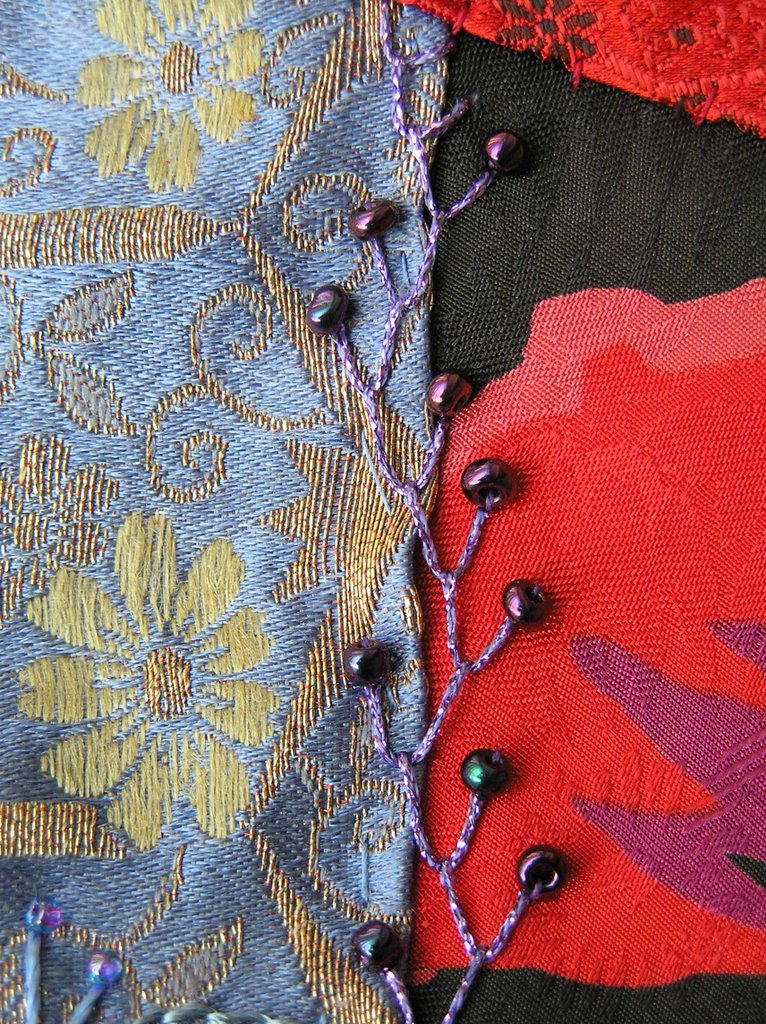
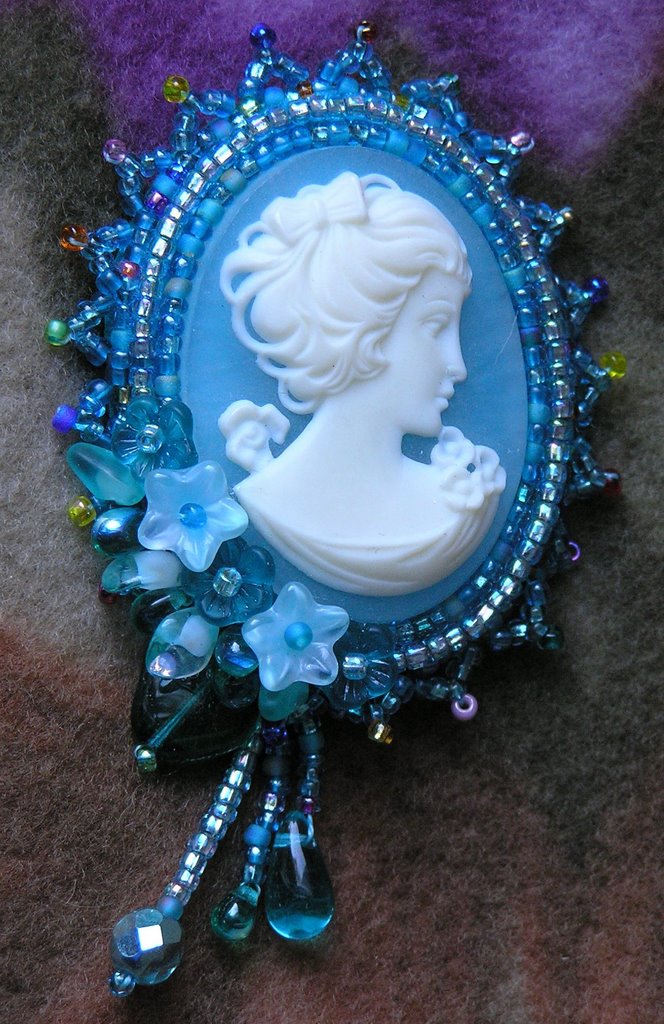
Here are the instructions on how I made my beaded cameo pin. The nice thing about this is that you can make a pin, or you can do the same thing to a button, cabochon, etc. and use it on your crazy quilt. If you make it a pin, you can pin it onto a CQ pillow, pincushion or quilt, give it as a gift or keep it and then pin it onto yourself when you want to wear it. Keep in mind, this is how I made the pin that's pictured - you can have fewer or more rows of beads around the cameo or a different decorative edging around the outside. Sometimes I do beads to match the cabochon for the first 2 rows and then white/cream beads for the lacy decorative edging.


Materials:

Cameo
Felt (about half an inch larger than your cameo, all around)
One inch pin-back
Suede, ultra suede or leather (slightly larger than your felt piece)
E6000 jewelry glue
Seed beads
Flower, leaf and other assorted beads for embellishment

Directions:

Glue the cameo onto a piece of felt, using E6000 jewelry glue. This glue allows the felt to remain flexible, so you can still stitch through it, if need be. I usually choose a color of felt that will match the two rows of beads closest to the cameo, in case there are any small gaps between beads. Wait one to two hours for the glue to dry.

Stitch 2 rows of beads around the cameo, into the felt. I start by stitching down 2 beads in a row, come back up thru the 1st and 2nd, add 2 beads and continue around. When trying to snug beads up against the curve of the cameo, it is better to have one too few than one too many beads. Trim the felt very close to the second row of beads, being careful not to cut any beading threads.

Next, you will glue this onto a piece of suede, ultra-suede or leather (but read on first). I choose a color of suede that will match my beading thread for the beaded border (because this will show on the back). Open up the pin-back. Lay it on your suede and mark just inside the two ends.

Cut 2 vertical slits in the suede about an inch apart so that the pin-back can be glued between the felt and suede and still be functional. I use a one-inch pin-back and position it about a third of the way down from the top of the pin. You can see my slits (especially that huge one on the right side in the picture below) Glue the felt, pin-back and suede together.


Once this glue is dry, stitch a row of beads into the suede, going around your other rows so that you form a third row. This row is the foundation row for the decorative border stitching. Carefully trim the suede very close to your third row of beads.

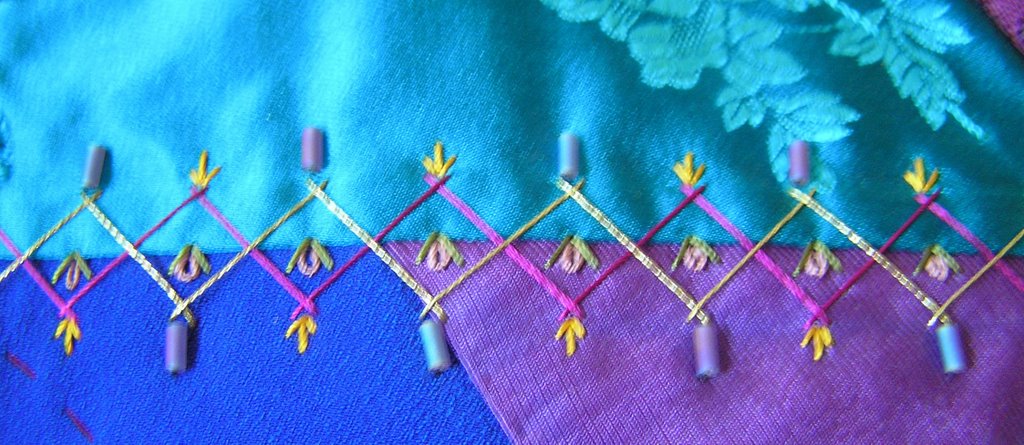
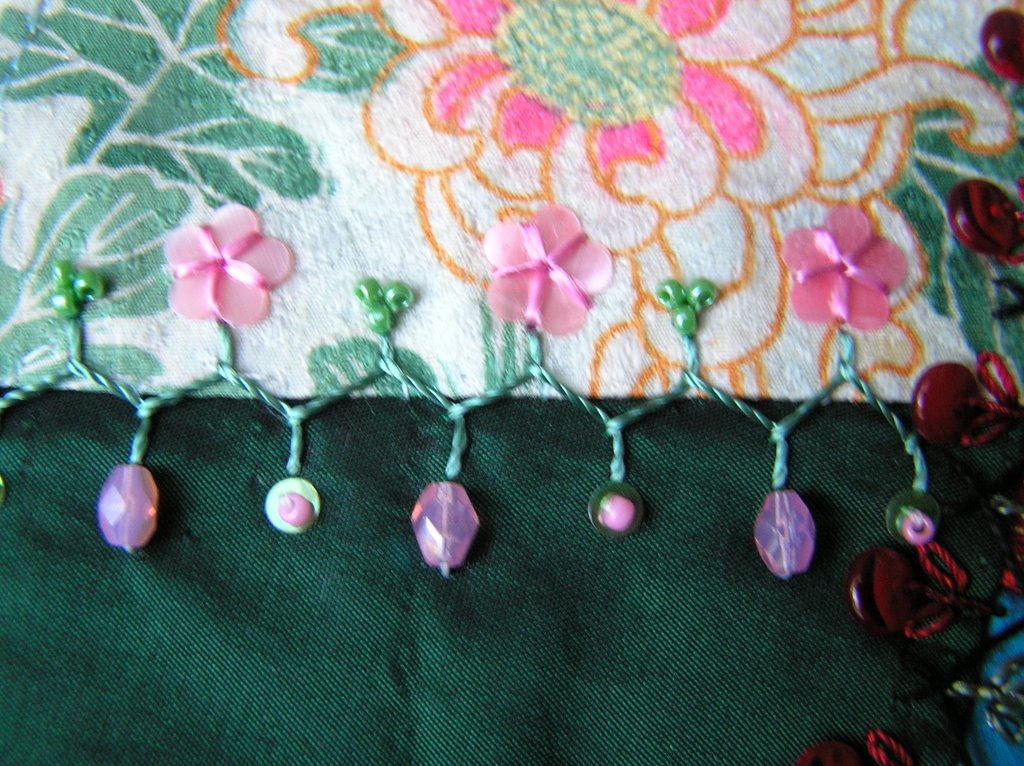
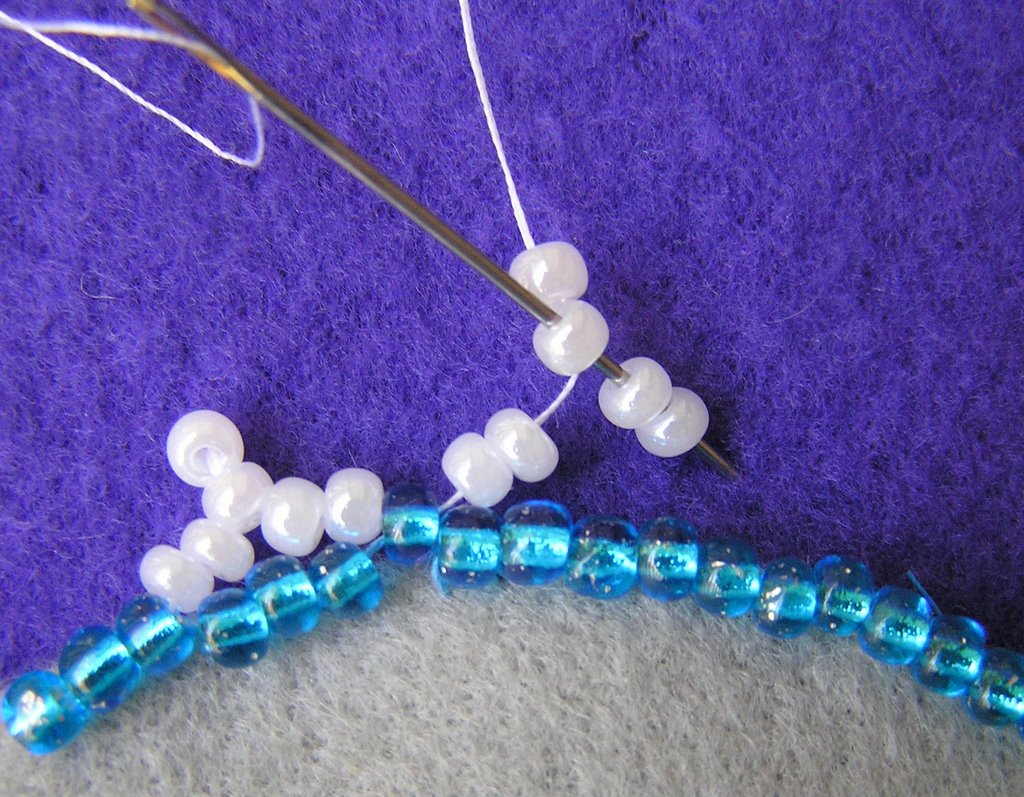
For my decorative border, I would go thru a bead in the third row, pick up four seed beads, go back thru the third seed bead, add two more seed beads, skip the next three beads in the third row, and go thru the next bead in the third row, over and over again. (See picture below) That fourth seed bead is the "point" that sticks out at every inverted "V". Once this decorative row is done, you can choose an area to add a bunch of flowers and leaves and dangles. This part is really fun.

For this picture, I used giant E beads, so the stitching for the decorative edging would be easier to see. So the effect is not as good as with seed beads, but you can see the details better. The turquoise beads represent your third row.


Have fun with this!

Thursday, October 05, 2006

Another Fans seam

Here is another seam of fans on my CQ kimono. This time I made them bigger and don't quite like the effect as much as before. It's amazing how you can stitch the same seam you did before and even use the same type of threads, but the stitches can streeeetch or shrink and you hardly notice it until you look at it later.

The lower fabric is very busy, so it was hard to figure out what would show up on it. It is a beautiful paisley, though, and belonged to my mother, so there is no way I would not include it. Happy stitching, everyone!

Tuesday, October 03, 2006

Beaded Cameo Pin & Simply Quilts


This would make a good gift for a friend or relative - it's a beaded cameo pin. I have made several of these in different color combinations - they are really fun; a great way to use small flower and leaf beads. Also, you can use seed beads that you don't have lots and lots of exactly matching colors.

This morning I was watching Simply Quilts. I know they are all reruns now, but I hadn't seen this one before. It was all about crazy quilts and featured the work of Judith Montano. She described CQ as the most painterly of all quilting methods. Betty Pillsbury was also on the show; she demonstrated how to piece CQ and how to do the feather stitch. She had done it in many different threads and in many different "variations" - they all looked so different you might not ever have identified them as feather stitches. It was a nice change from sane quilting.

Monday, October 02, 2006

Back to CQ!


Well, I'm back from the land of baby showers and hoping to get back into stitching on my CQ kimono. I haven't had time to read any blogs lately, but am wondering if everyone else feels the lack of the 100 Details like I do. I went to work on a seam, but there's no checking on what Sharon has showcased and it seems Allie has stopped stitching along also. Hmmm, it's a different feeling to be on my own again.....I'll just have to check out what everyone else is doing! (Now that school has started again, it's a little harder to wrestle the computer away from my girls.)

Well here's my latest seam - I don't want it to stand out too much - it's near a sleeve seam that needs to be more prominent.