Monday, July 31, 2006

Day 10 of 100detailsin100days


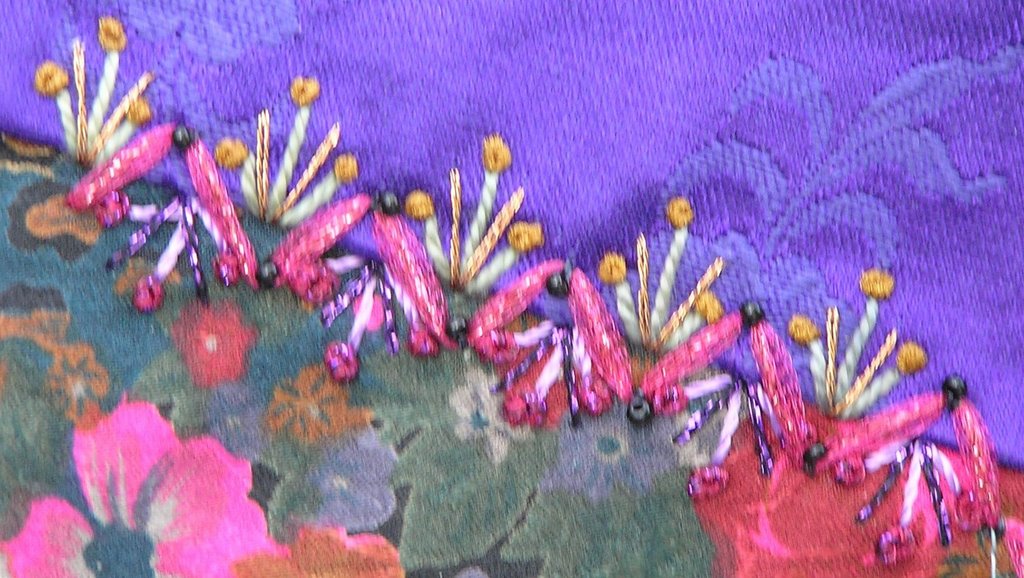
Here is my version of SharonB's Day 10. I ended up putting my half-circles all on the same side of the seam to try to bring together the cream and red/maroon. I have to admit, I had a lot of trouble with this circular buttonhole stitch. Is it easier if I use a less slippery thread? (I used silk.) Each of my circle pieces wanted to fall in on the previous one, so when I was done, I went back and took a little tacking stitch to make them all pointy on the ends. I am no beginner, so I can't understand why this stitch gave me so much trouble....So if any of you would like to clue me in, I'd appreciate it. Maybe it's tension?(yes, I was getting tense, ripping and restitching)

Saturday, July 29, 2006

Cherry Blossoms done!


Well, I was able to finish the cherry blossoms on my CQ kimono and I love them! The sequins were a little transparent, so I ended up sewing two on top of each other so they would show up better. I wanted the stem to stand out, so I backstitched it with 4 strands of silk floss, then whipped it with some Rainbow Gallery nylon fiber, then whipped it again with some Caron variegated brown.
I hope it doesn't end up looking too "busy" once I finish embellishing all the other seams. I've had the flower sequins for years and never used them before. Sometimes I get weird about using up one of my trims or embellishments, especially if it is antique. I want to always have it, so when I use it all up, it seems sad. Does anyone else feel this way, I wonder. Oh, well I will get to see the flower sequins when I'm all finished with the project. I was thinking you could make your own custom sequins by using some of the punches that are available in the craft stores and punching shapes out of old large sequins. I guess you'd have to poke the hole through the center, though.

Thursday, July 27, 2006

August Threads Magazine

Has anyone seen the August issue of Threads Magazine? In it, there is a very interesting button treatment for decorating a sweater. I can't post a picture of it, of course, since it's copywrited. I will try to describe it.

There's about a 3 inch band of decorated area around the cuff of each long sleeve, as well as around the neckline. Within these three inches are tons of shankless buttons sewn all next to each other using the same color thread. But the buttons aren't sewn on in the traditional manner, rather a stitch may go from one button's center hole to another button's hole or to the backing fabric near it. The effect is like a bunch of spider webs going in and out of all these buttons' holes. I know I'm not doing it justice at all, but check it out if you get a chance.

Wednesday, July 26, 2006

Storing Silk Threads & silk ribbon...

I have my CQ threads stored in some of those large plastic transparent boxes. Unlike Sharon, I separate my threads by type, rather than color. Each type is stored in ziplock baggies. I try to get the ones with the holes in them(labelled Vegetable bags), so the threads can "breathe". But not the silk. Silk needs fresh air, so it doesn't mold or mildew. I have made small "bags" out of (2 layers of) tulle to hold my silk threads. I also like to throw in one of those silica gel things you get when you buy new shoes or whatever...
Here is an example of a bag I made for my buttonhole twist.....


Someone's blog (can't remember whose) showed their recent acquisition of a beatiful pile of silk ribbon. One cheap & easy way to store silk ribbon is on film canisters. They are usually free for the asking at the photo development places. (I prefer the white ones) Just wind the ribbon around the outside, and tuck the end into the lid. If you want to save any info on color number, brand, etc. just stick it inside the canister. Presto!

Tuesday, July 25, 2006

CQ Design aid

I just hit upon a great idea for testing out a seam treatment. I am making a CQ kimono. No, not one to wear, a small one to display on a stand in my living room. The finished size is about 13" high, with CQ on both sides. I pieced it so there is a straight line down the middle, where the opening in a kimono would normally be. I have some cool flower shaped sequins that look like pink plum or cherry blossoms. I wanted those to go down the middle. But every time I embellish a horizontal seam, I never know how close to that center line to get with my embellishment.

So here's what I did: I made a color copy of my pieced and partially embellished kimono, concentrating on the center line. I put it inside a plastic baggie, so it would lay flat. (If I had had a transparency I would have used that.) Then I got out my brown sharpie and drew the stem and placed the sequins on the stem in little groups. Bingo! Now I can see how it will look before I stitch it and avoid big clumps of sequins in some places and too few elsewhere. I am so jazzed!

I may slow down on stitching along with the 100 details while I work on my cherry blossoms...


Day 2 of 100detailsin100days


Here is my Day 2 seam embellishment of SharonB's 100detailsin100days. (As you can see, I am not going in any particular order with the 100 details. My project is a small one and I need to vary the types of stitches I put next to each other.)

Since we use so many different threads for crazy quilting, sometimes it's hard to get the thread through the needle. Did you know that if you're having trouble threading your needle, sometimes it's easier if you just turn the needle over and try from the other side? The needle hole is punched from one side, so just like if you poke a nail through a piece of paper, one side is smooth and the other has some ragged edges. Although these ragged edges are smoothed away, the hole on one side is still better.

Speaking of different threads, last night I was using some of my metallics (glissengloss) and they are wound on those small cardboard floss holders. When I want to embroider, I have to iron the folds out of the thread before I can use it. This is annoying, especially when it's 90 degrees and I'll do anything not to have to turn on my iron! So this morning, while watching Simply Quilts, I started unwinding them from the cardboard tubes and onto some empty spools. I'm hoping the folds will go away after awhile.

Friday, July 21, 2006

100 Details for 100 Days: Day 21


Here is my Day 21. It was really fun to dig into my bead stash and decide what to use. The round "beads" are actually antique sequins and are that color of shiny bluey-purple with green like you would see in spilled gasoline on the street(lovely image, huh?) Is there a name for that color? SharonB had it right in her Day 21, when she mentioned that the simplest stitch combos create interesting responses. I think it's because there's so much leeway in the threads and beads you can use. I had fun mixing the different metallics. But what I really liked was bringing that green down into the cream/gold block.

Wednesday, July 19, 2006

100 Details for 100 Days: Day 12 and not happy


Well I guess it happens to everyone sometime, but it's a bummer....You spend a few hours stitching, ripping, changing colors, re-stitching and finally finish and I don't really like it. But here it is anyway....See Sharon's Day 12 here. I made my straight-stitch sprays too close together to weave cording the way Sharon did, so just anchored down the zig-zag with beads.

Last night I was auditioning threads for the zig-zag stitch and happened upon an idea. I have a sleeve roll (one of those cylindrical pressing aids), but a ham could work also....
I pinned my CQ to the sleeve roll and placed black-headed pins at the top and bottom of where I ended up putting the zig zag. Then I was able to weave various colored threads around these pins, to audition the thread for color and also to see what it would look like with black beads. I have a box of pins with various-colored heads and so could use those to audition bead colors. Just a thought....

Tuesday, July 18, 2006

100 Details for 100 Days: Day 19 & Day 2


Here is my version of Sharons Day 19


And my version of Sharon's Day 2

While going through my stash of threads to embellish seams with, I notice that I always buy plenty of leaf/stem greens and lots of flower colors: pinks, reds, yellows, purples and even blues, but I never seem to think of brown. I'm currently working on a small CQ piece that has some of my favorite fabric in it and I hardly have any browns to work near it. Well, next time I shop for threads, I will remember this.

-Lynne


Saturday, July 15, 2006

Faux CQ


This is a purse that is "faux CQ". It's not pieced, but is divided by decorative seam treatments as though it is. I really enjoyed making it, including the beaded handle.


The lavender "thread" making O shapes on the upper right hand side is actually a thick velour that is woven under the dark purple straight stitches, first woven Right to Left to make a serpentine, then L to R to make "O"s. I've done this with some other threads that are more slippery and they don't hold a good shape like this velour.


You can see just a touch of a shiny purple herringbone near the bottom. I wove some lavender velour in and out of it and the difference in textures is really cool.


This circle of SRE includes a pistol stitch flower, a curved buillion-tipped lazy daisy flower and a ruffled flower that I made up. I can post the directions for the pink flower on a later blog if anyone's interested.

Thursday, July 13, 2006

100 Details for 100 Days: Day 11

Here is my version of Day 11 of 100 Details. The teardrop beads replace SharonB's oyster stitches and the stitches on the print fabric are decorative lazy daisy, decorated with silk ribbon. I wish I had been able to get things more evenly spaced, but....
Thank you to those who welcomed me to blogLand. I really appreciate it since I was apprehensive about making some huge mistake that would annoy someone - I should have remembered that stitchers are such nice people!

Tuesday, July 11, 2006

My first blog post


Hi there,
I've decided to stitch along with the 100 details, but I'm a slow stitcher. Here are some pix of one of my mom's CQ blocks. She started it and I added to it.