Tuesday, April 28, 2009

Book Review


Recently I bought this book "M. Joan Lintault: Connecting Quilts, Art & Textiles". She makes very interesting quilts and the thing I like most about most of them is that they have holes in them! She's made a quilt that has a latticework background, filled in near the edges with flowers and butterflies. Sometimes her quilts have sewing machine lace between the main images. Her machine lace is beautiful and sometimes has a very fluid, water-like quality. Her quilts are not usually square and are the kind you want to stare at for a long time, to see every detail. She never uses commercially printed fabric, instead she dyes it, stitches it, then paints it, achieving a fabulous depth of color and texture. This book is a wonder to wander through, with lots of great pictures, inspiration and thoughtful prose.

Happy Stitching,
Lin Moon

Sunday, April 05, 2009

Assisi panther


I've been working on this piece for SharonB's Stitch Explorer 2009. In Assisi, the main motif is left unembroidered, but is surrounded by embroidery. I really like black, so decided upon this panther for my main motif. I had some challenges with stitching over the felted portions, like underneath the panther's body. The felted area stood up higher than the panther, yet needed to look like it was underneath/behind it. I had fun doing the fern on the right in the trellis stitch, and wished I had tried it sooner (as in last month's Stitch Explorer). I took the panther from a tapestry I have showing a tiger(see below).
This was really fun - I think I could improve on it, but will call it finished for now.....


Thanks Sharon, for another wonderful challenge idea.
Happy Stitching,
~Lin Moon

Thursday, March 12, 2009

Raised Cup Stitch

In SharonB's Stitch Explorer 2009, the featured stitch for March 15 was the trellis stitch. Although this post is about the Raised Cup Stitch, not the trellis stitch, the directions are similar - only the beginning differs. This is one of my favorite stitches, and I wanted to share it with you.
My stitch diagrams were originally for use with silk ribbon, since that is one of my favorite ways to do this stitch. In the photos, I am using a chenille fiber. It's good to use a fiber that is not easily split. For each step, first I show the drawn diagram, then the photo(s) of the actual stitching.


1) You begin by making 3 straight stitches to form a triangle. In the photo above, the black dot represents A in the stitch diagram above.


2) In the photo above, I have changed to yellow thread to make it easier to see. But normally you bring your same thread up at one corner of the triangle, and switch to a tapestry needle. All future stitching is done without piercing the fabric, until the flower is complete. Slide your needle under one of the straight stitches and bring the thread over, then under the needle. Pull tight to form a knot. This knot should be snugged down near the corner of the triangle where you first brought your needle up (A in the diagram).


3) Slide your needle once again under the same backstitch and bring your thread over and under the needle. Pull the needle through and form a knot close to the other end of this backstitch. Now the first side of your triangle has two knots on it, with a bar connecting them.


4) Slide your needle under the next backstitch and form a knot. This knot will be very close to the previous knot, making the bar between them very short. In the stitch diagram, you can see a black needle placed there to make sure that there will be a bar (however small). Slide your needle under this backstitch again and make a second knot. Now there are four knots and 3 bars connecting them: a long, a short and a long. See the stitch diagram below.


5) Now form two knots on the last backstitch, being careful to have a bar, however small, when you go around the corner. Now you have six knots and five bars, three long and two short.


6) Now slide your needle under the bar you formed on the first backstitch and make a knot. I switched to grey thread to help you see, but you would continue around as shown in the diagram above.


7) In the photo above, I have continued around, forming 2 knots on the long bars and only one knot on the short bars. I have gone almost all the way around with the grey. Once you are happy with the flower, you can end your thread by weaving it vertically in and out of your stitching and piercing the fabric near your triangle of backstitches.

The following photos show how the flower comes out when finished. A bead in the center is a nice touch.


Thursday, February 26, 2009

Kiwi Done for Fertile Earth class


I finished lesson one of the Fertile Earth class. This was inspired by a kiwi (see below). The background was supposed to be stamped, but my stamping didn't really work out well for my kiwi, so it was back to the wood-burning tool to cut some "leaves" and swirls and those made up my background. I used Misty Fuse to adhere the cuttings to the background fabric and meant to put some tulle on top of it before plopping the kiwi on, but forgot the tulle. This isn't a mistake I want to make again. All the lint, threads and everything else then sticks to the Misty Fuse. I was constantly picking these off - they made it look dirty. Anyway, this was fun and now we are on to week 2. The inspiration? Flowers! Oh, how will I ever choose just one flower to be inspired by?

Happy Creating,
~Lin Moon

Tuesday, February 24, 2009

Fertile Earth Class

I'm taking Susan Sorrell's Fertile Earth class at joggles. You can see the picture for the class here. This is the first week and we are doing a piece inspired by a fruit or vegetable. My inspiration was this picture of a kiwi. You can see that I changed the colors a bit! I started out with some lavender fabric, which I cut out in an oval shape using a wood-burning tool like Allison Aller explained in the current issue of CQMagOnline. I layered some tulle over it, then a darker purple, then some white satin and tulle in the center. At first it looks pretty blah, but once I added some embroidery, I just couldn't stop. Purple is my favorite color, so it's hard not to just do everything in purple! This has kick-started me into doing something creative and is just what I needed, plus it's really fun!


Happy stitching,
~Lin Moon

Monday, February 23, 2009

Leaf for Tree Project


Here's a leaf I've been working on for the Tree Project. I just haven't been able to get motivated to be creative lately, so I started this since it's a small project and you can pretty much do whatever you want. The due date is March 15, so there's still time if you'd like to get involved.

Also, I've signed up for Susan Sorrell's Fertile Earth online class on joggles.com. This is another effort to kick start my bag-o'bones to "get creative!". We're just on the first week, but so far it's fun and I'll post a pic or two soon.
Happy creating,
Lin Moon

Monday, January 19, 2009

Road to California

This last weekend was my birthday and to celebrate, I went to the Road to California Quilt Show '09 with my older daughter. It was a great show with lots of quilts on display, tons of vendors, plenty of places to sit and rest and it was wonderful! It was so big that I didn't get to visit all the vendors or see all the quilts, but I had a nice conversation with Helen Gibb, and also with Barbara Willis. Her dolls were absolutely amazing! She goes to France and England to buy wonderful trims, buttons and laces. You can see pix of her dolls on her website here.

I took some pictures of some of the quilts on display. Of course, the pictures just can't do them justice. This first one is, of course, inspired by Klimt's "The Kiss" and is called "The Kiss Dressed in 9 Patches" and is by Joyce Hughes. It got an Honorable Mention. It was so beautiful! This is a favorite painting of mine, so to see it stitched was glorious! If you've never looked at this artwork, it is so interesting - all the motifs on the man's clothes are square or rectangular, with lots of corners. All the motifs on the woman's clothing are circles, rounds and curves.


Here is a closeup of the bottom of the quilt, with all the flowers


This quilt is called "Rhapsody at First Light" and is done by Bonnie Keller. This is the center medallion of the quilt. It is surrounded by lots of interesting details.


Here is a close-up of one of the corners. You can see a bird, and then there are many "hidden" creatures all over the outer border, like this trapunto mouse.


This is a small quilt, and all the cherries are 3D. Their stems are seed beads (on wire?), protruding out of the quilt. This was cute and clever. It was done by Elaine Emmons.


There were some purses there also. This one is super encrusted with beads, buttons, etc. and is called "Hippie Chic" by Susan Gannon O'Connell.
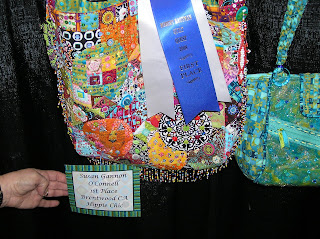

Here is a closeup.


There were not a lot of crazy quilts there, but this one is by Charlotte Noll and is called "My Crazy Life".


This quilt is called "Fairy People on Parade" and is by Janis Hooker. I really liked the different styles of the people here. I'm not a big fan of cutesy and know how hard it is to avoid when you can't draw well (since I can't), so I liked the whimsy of it.


This one was cool....


OK, the picture quality here is not too good, but I really loved this quilt. It was very small, about the size of an 81/2" by 11" piece of paper. But it was so beautiful and very dimensional. It was by Nicole McHale and was called "Garden Walkway". The grain of the wood is done by machine embroidery. The plants get very 3D in the lower left corner. I apologize for the poor quality of the picture - this small quilt was breath-taking.


Here is a closeup of the grasses at the top - they seemed to be done with untwisted thread, maybe silk?


All in all, it was a great show. The only thing was, it ended at 6 and at around 5 we realized there was another whole room we hadn't even seen yet! Also, my husband did NOT get laid off from his job(YAY!), so after being on pins and needles for 3 months, I was able to rescue my poor husband from his problem of "Oh, no, honey, I don't have anthing for your birthday." by saying "Oh, you poor thing, I guess I'll just have to buy stuff at the quilt show!" It couldn't have worked out better...

Happy Stitching,
~Lin Moon

Wednesday, January 14, 2009

Cutest pincushion

Isn't this the cutest pincushion you've ever seen?!?!!!! I just love it. My sister gave it to me for Christmas.


My daughter gave me a box she painted - here are some pix of the top and the sides. She's only 16, and did a great job!


I am sort of grasping about, wondering what project to start working on. This is typically the time of year I have the most time, but I feel frozen in time wondering if my husband is going to get laid off, whether to start trying to get the house ready to sell, to look for a better paying job, what to do, what to do.... I've been toying with the idea of a joggles online class, working on a quilt for the quilt contest, etc, but just can't get focused on anything....

Hope you're more creative than I've been lately,
~LinMoon

Saturday, January 03, 2009

Happy New Year


Happy New Year to you all!

I hope you all had a good holiday. Although we still don't know about my husband's getting laid off, we had a very nice Christmas. It was small, but with lots of family and love and laughter.

Four of us gals used to get together for coffee every Thursday night years ago. One moved up north and the other moved to NZ a few years back. They were both in town at Christmas and the "coffee club" came together once more! Our kids were younger when we used to meet regularly and it was always hard for all 4 of us to be available to celebrate birthdays, etc, so it was amazing that we were all 4 available on a day's notice to get together! It was very fun and I made my friends a couple more matryoshka ornaments. (I think I spell that "m word" different every time!)

Saturday, December 06, 2008

More Matryoshka

Well, the Matryoshka machine is still spinning. This first one is for a friend named Sakura, which means cherry blossom. How perfect is that? I usually don't like using plastic beads and don't even know where I got these, but I just HAD to use them. The middle one is my favorite - I just love the combination of these two fabrics. I am having such fun with these! And the last one is for a friend whose favorite color is this green. I'm so enjoying picking out the flower beads and the other embellishments!
Happy Stitching,
~Lin Moon