Friday, September 22, 2006

Day 89

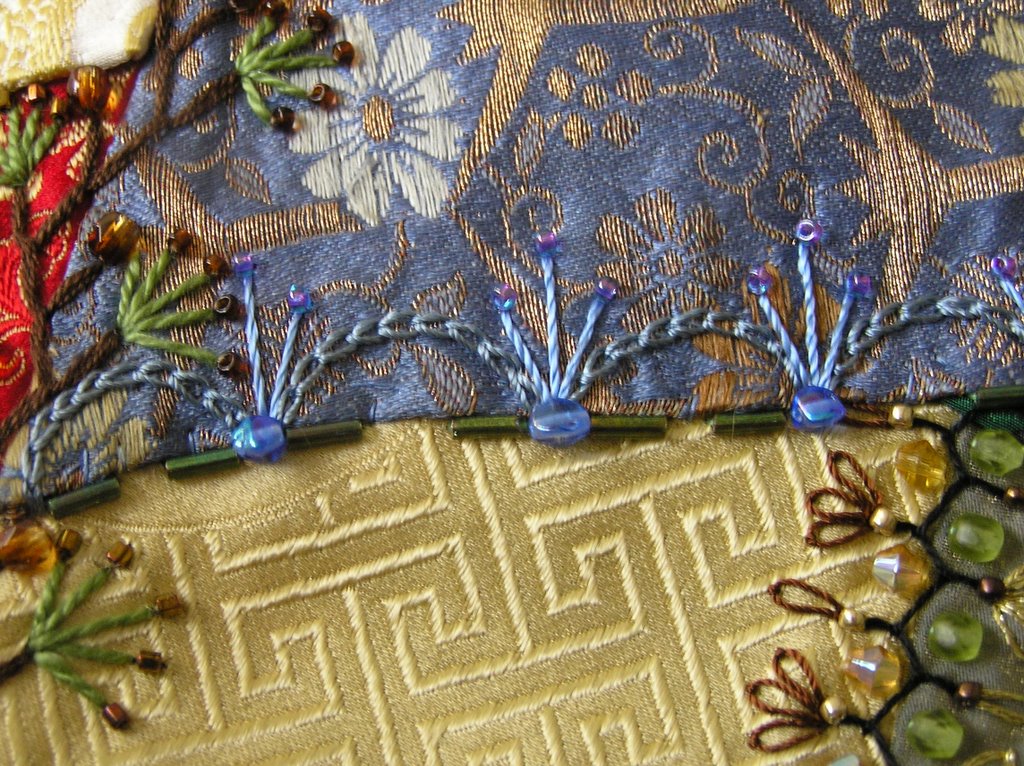
Here is my version of Sharon B's Day 89. When I saw Sharon feature this one, I just loved it! This is a horizontal seam near the sleeve that I don't really want to emphasize, so my embellishment is all in the same color as the fabric beneath it. I added in the green bugles to try to make the gold and blue flow together a little better, but I'm not sure I've accomplished that.


Here is another picture showing more context.

Thursday, September 21, 2006

Fun Seam Treatment


Here's another seam on my CQ kimono. I really enjoyed all the different beads and threads I used here.

Wednesday, September 20, 2006

Day 90

Here is my version of one of the seams in Sharon's seam-packed Day 90. This was a quick and easy one - although it was hard to decide what to weave in and out of the running stitch.


Tuesday, September 19, 2006

Playing with Shrink Plastic


Ever since I saw Hideko's picture with the small charm in it, I've been curious about making my own "charms" out of shrink plastic. I ordered the kind of shrink plastic you put through your inkjet printer. I copied some motifs from some asian fabrics, and had mixed results. You can see the round motif didn't really come out round when shrunk. I kind of expected that to be the case - it seems the shrink plastic doesn't shrink uniformly in all directions. A few other motifs didn't come out because the color became so dark you can't even tell it's a chinese lion, for example.

The "cherry blossoms" came out pretty well - I printed some of the red brocade fabric onto the shrink plastic and then cut various sizes - you can see the original size in the white paper and the shrunken size on top of each paper blossom. I wanted a small charm, so I kept cutting them smaller and smaller.

You do have to adjust the color saturation before printing them, so they will print lightly and then not darken too much when shrunk. I just imported the scanned fabric into an image editor and adjusted the color there. You need to set your printer to print on transparencies and be sure to print on the correct side of the plastic (the dull side). When going through my printer, at first the plastic wouldn't advance, so I had to give it a little push at the start. After printing on the plastic, cutting out the shape, and punching holes, I dusted each one with some baking soda (I think anything powdery will work) so it wouldn't stick to itself during the shrinking process. I used my embossing tool to shrink the plastic; I don't have the patience to wait for the oven. When almost done shrinking, I would turn the piece over so I could see the white back. This way I could tell if it was starting to scorch, since it would turn a little brown. You want to avoid scorching, since the brown can show through to the front. While still hot, I placed a heavy book on the item to flatten it out. When cool, I coated the cherry blossoms with a little water-soluble varnish. I would have liked the varnish to make them a little more shiny.

I think the charms Hideko used are prettier, but that involves encasing real fabric in resin, and I don't want to mess with the dangers and fumes of that. (Not that shrinking plastic doesn't have fumes, too) I think that if there's a great motif on fabric that you'd like as a charm, you could copy the fabric into an image editor, enlarge it, lighten it and try printing that out. I may try that in the future.

Friday, September 15, 2006

Enamel button Eye Candy


Here's another pretty button to enjoy. Hope you have a good weekend.

Vine

Here is my latest seam - it wasn't meant to look Christmas-y, really. I'm just trying to bring in the red from above left and the maroon from down below.


And on an entirely non-CQ note, my stitching is slowing down because of another project I've been working on - baby shower invitations. If you're interested, there's a pic further down. I found these baby letters in a magazine a long time ago, but the only letters were T, I and F. I modified them to keep the babies in them, but moved the borders of the letters around. I think it's pretty cute, even if I do say so myself!

Wednesday, September 13, 2006

Iris seam


I just realized that this CQ has hardly any SRE in it, which I love to do. But then it's not a frilly feminine project like some. So I did a seam of SRE irises. I hope they don't look out of place in the whole....

I was reading another blog (I apologize - I can't remember which one) in which the blogger said she had just taken a CQ class with Judith Montano. Seems JBM has a strict rule about not putting pattern next to pattern when piecing. Strict to the point of ripping out! Hmmm, I like the no-rules "rule" of CQ better.

Tuesday, September 12, 2006

Day 59

Here is my version of Sharon's Day 59. I'm just jumping all over the place in her 100 details to see what will fit nicely where I am currently working on my kimono. I can't seem to get the short, fat herringbone down, but I think it's just because I only have about 3 inches, if that, for each seam embellishment. There are some pretty motifs on the Embroidery Motifs group over on yahoo. I'm looking forward to seeing more and hoping to work on a few interesting motifs once I'm done with this kimono. I may even get paisley fever! There are some gorgeous paisley prints in the fabric stores.

Saturday, September 09, 2006

Day 73 or The Curse of the Red Beading Thread


Here is my version of Sharon's Day 73. (I just can't believe we are this far along already!) I started out using bugle beads like Sharon did, but ended up replacing them with the straight stitches (between the detached chain trios). My "rick-rack" is space dyed with a little glitter in it, so I didn't want to cover it up with zig-zag chain stitches, so I just stiched it on with a thin metallic. I think the "2 bead drop" (sounds like a dance) is so sweet, so I definitely copied that. The fabric above the seam is actually purple, although it looks blue in this picture.

What is The Curse of the Red Beading Thread? I have several colors of beading thread that I bought in San Diego several years ago (when I took a bead embroidery class with Nancy Eha - that was fun!). I'd never before seen so many options for colored bead thread; it's nice to see them in person, so you can choose the shade you want. Well I only have a little of the red left. And every time, I mean EVERY time I stitch some beads with it, I rip it out. Then I have even less of the red thread and I've totally wasted it. Of course, the bugle beads were stitched with the cursed red thread. Maybe I will have to throw it away to escape the curse!!

Wednesday, September 06, 2006

Another Button


Well, no new seam to show today, so I thought I'd share another button. Pretty, huh? Tomorrow is the first day of school for my girls and I'm having a meeting at my house tomorrow night, so I've been cleaning instead of stitching (What has happened to my priorities!)

Anyway, I was looking through some of my books and found a couple of Evening Star Designs catalogs. Whatever happened to them? I searched for them on the web and they seem to have disappeared into thin air.

Keep on stitchin'...

Tuesday, September 05, 2006

Day 61 of 100 details for 100 days


Here is my version of SharonB's Day 61. This was such a small seam to embellish, I was only able to fit 3 flowers in it. The little gold Xs are made using holographic thread. Sounds magical, doesn't it? I'm fascinated by some of Sharon's great lace embellishments, but will have to save them for a future project, as I don't think lace really fits here on a kimono.

It's amazing how when you're creating, you get more creative. Since I've gotten back into CQ, I have sooo many ideas for the next project (or 10 projects). Yet when I wasn't doing anything, I felt ungrounded and was constantly searching for something to inspire me. But then, that's before I had all the great web pictures to look at. It really is great to be able to share photos this way and see what wonderful things other people are doing.
Keep on stitchin'...

Monday, September 04, 2006

The Most Beautiful Button

I haven't stitched another CQ seam, and this being the Labor Day holiday, probably won't get to it until tomorrow. I thought I would share with you some of my buttons. They are like miniature works of art and can be so inspiring, design-wise. This is one of my favorite enamel buttons.
One year my mother came out to visit me from Georgia. I told her I had The Most Beautiful Button In the World and I wanted to show it to her. I proudly went and got it and with much fanfare, presented it to her. Her appreciative response? It was, "I have one just like it!" Blew the air right out of my sails. It turns out that I got mine from my Grandmother(her mother) and so did she. We both had a laugh. Anyway, I just loooove Art Nouveau and the flowiness (is that a word?) of this design, so I stitched a simplified version of it in beads. You may have seen it on Flickr here.

Happy Stitching!

Friday, September 01, 2006

Silk Ribbon Embroidery Heart


I haven't had a chance to work on my kimono, so I thought I would share this SRE project I worked awhile ago. It was for a class to teach at Piecemakers in Costa Mesa. I really like the bird charms and the way the irises turned out. Some close-ups follow. Hope you enjoy the eye candy...

Thursday, August 31, 2006

The Other Side


I started the center seam on the other side of my kimono. I chose this design because it reminds me of so many of the pine tree designs you see on Japanese items. I like how the larger beads fade from dark to light (they're laid out to the left of the seam). The seed beads are metallic and kind of copper-colored, but don't show up well on all the fabrics. So on the blue fabric, for instance I'm using some darker brown seed beads. I'll have to choose which seed beads to use as I work my way down the seam.

Happy Stitching!

Wednesday, August 30, 2006

Kimono Half Done!!!


YAY! I have finished the embellishing on one side of my kimono! I can't decide which is my favorite seam treatment. I've already started the center front seam of the other side, which will take awhile since it is kind of long.

Tuesday, August 29, 2006

Day 64 & Day 33 combined


Here is my latest seam treatment. The top portion is from SharonB's Day 33 and the lower portion is an adaptation of Sharon's upper treatment in Day 64. Sharon's Day 33 has bugle beads up against the cretan stitch, but I didn't make my cretan stitches big enough for that, so on the other side I put my version of Day 64. I really like Sharon's elongated pearls, but I only have those in white & I needed more color here.


Yesterday's seam treatment,
replaced the one below, which you can see is very lightweight. Since I am working on a kimono, I wanted the seams delineating the sleeves to balance out. I don't think all the seams in a regular block need to be the same weight....

Monday, August 28, 2006

Another CQ seam Redo


Well, I had to take out another seam and redo it. It seems (no pun intended) that I chose a light and airy seam treatment on a seam that needed a little more punch, to balance out the other side of the kimono. I replaced it with this seam treatment, which was a lot of fun with all the different beads. I'm finding that on a small project, some of the seam treatments just don't work - they need more space than a few inches. So I will have to save those for my next project.

A tip for whose eyes are as bad as mine....
I am a detail person. I've always had trouble with the "big picture" and love to get down to the knitty gritty, especially when looking at all the fabulous embroidery on the web. Sometimes a block I see just doesn't have enough detail for me to tell what the stitcher did. So I do a "copy image" and "paste" into a word document, use "print preview" and then look at the stitches at 200-300%. It's a great way to see the details.....

Sunday, August 27, 2006

Shoppping Jackpot & Button Wreath Closeups

I hit the shopping Jackpot! Yesterday I went to my local JoAnn ETC. (fabric/craft store) and they were selling discontinued samples from their home dec department. So there were lots of silky, shiny wonderful fabrics. Each sample was an 18" square and was 50 cents! Perfect for CQ! I avoided the thicker fabrics that were for unholstering a couch, but got some lovely golds, creams, greens and blues.

In response to a request for more Button Wreath close-ups, here are a few.


I love the way mother of pearl can look white, creamy, peach and rainbow....

Friday, August 25, 2006

Another CQ seam (redo Day 19) & Button Wreath

Here is one of my seam treatments. I had woven the herringbone stitches with some velour, like in SharonB's day 19, but it was too heavy , so I went with a more lightweight thread for the weaving and added some embellishment also. The blackish cord Sharon used for her weaving seems to be useful in so many ways. I'd like to know what exactly that is. Sharon, if you're reading this, can you tell us more about your cord?

I have mentioned before that I got a lot of buttons from my grandmother, and when she died no one else wanted them, so I got more. I had so many mother of pearl buttons; they are so pretty and just sat in a drawer, so I made a wreath out of them. I wrapped a wreath form with some gold ribbon, then glue-gunned the buttons on. Hot-melt glue peels right off of pearl, so if I ever want to use them for something else, they aren't ruined or anything. I really like the cat and the bird buttons.


Blogs and Buttons

I just discovered 2 new (to me) blogs while surfing. Check out:


Judith's Material Musings

and

Rick Rack Ruby

Since we can never have enough embellishments for our crazy quilts, I was surfing around looking for charms and cool buttons. There's lots to see at:

JustNan for charms

Mill Hill for treasures(little glass birds, etc.)

Susan Clarkes for buttons, charms, etc.

Happy embellishing!

Thursday, August 24, 2006

Miscellaneous Musings.....

No pix to share today. Instead of stitching yesterday, I spent some time with the latest issue of Quilting Arts Magazine. Always a happy day when that shows up in the mail! Their 2007 calendar challenge is described somewhat like: make a quilt inspired by the setting, a character or a mood in a favorite fiction book. This just seems amazingly difficult to me. There's a big difference between making something beautiful and evoking a mood. I would like to do something like this, but don't even know how to start thinking about it. Do you truly pick a book you love and go from there? (You can't use any images or phrases from the book because of copyrights) Or do you choose a technique or an idea that you think you could do and find a book to match? I guess this really puts me in the category of craftsperson, not artist. Of course I have no training in the arts, but I'd really like to know how to traverse this path from A(book) to B(idea).

The other thing I spent yesterday doing was pouring through Carol Sample's book, looking for that trellis pattern. At first I thought it would be impossible to find. But then I realized that I had never actually read the book, just looked at the pictures, which is a bad habit of mine. Her categorization of all the stitch types is so left-brain for such a right brain activity as making these beautiful stitches! I was surprised.

On a humorous note, I was thinking back to when I was embroidering my jeans as a teenager in the 70s. I didn't know the stem stitch, so did a lot of outlining of motifs in backstitch. I didn't like the way the outline looked chopped up, so I would go back and whip the outline to make it look better. I thought I had invented the whipped backstitch! The funny thing is, though, that I didn't think it was a good thing, I just thought of it as "cheating" to get my final motif to look better. Teenagers.....

Today I was teaching my daughter how to sew (she's 13). We are making a stuffed dragon. It has felt spines on its back that had to be sewn together. I showed her the usual method - stitch to the point, needle-down, rotate and continue stitching. There were about 10 of these spines. I sometimes forget she's still a child. Every time she got to the "rotate" part, she would sing out "Wheeeeeee!”

We had to cut off a few spines after they were sewn together. She loved ripping out some of the stitches, (she has a totally different attitude toward the seam ripper than I do) then played with this little thing that was left. Sometimes it was a bird, sometimes a plane, sometimes a pterodactyl, sometimes an elephant. Later she spent 2 hours cutting minute pieces of felt for legs, attaching sequined fabric on its back and sewing on 2 sequin eyes. Now she has this cute little 3" dragon that she's so proud of! Kids are amazing....

Tuesday, August 22, 2006

Fans seam treatment


Here is another seam treatment on my small kimono. I started out with the chain stitch in a serpentine curve, ready to stitch one of Sharon B's 100details, and then decided to try fans. I used cotton embroidery floss for the chain stitching, then rayon ribbon floss (Rainbow Gallery's Neon Rays) for the lines in the fan. The black is size 8 Pearl Cotton - straight stitches on the sides of the fan and a (short-tailed) fly stitch at the base of each fan. I really like how it came out. Hope you do too ...

Monday, August 21, 2006

Iris Susan's Trellis seam treatment


When I saw this seam treatment of Iris Susan's I fell in love with it and just had to try it. It looks oriental to me, so I put it on one of my kimono seams. Check out the rest of her seam treatments - they are wonderful! Here is my version

I found it very hard to get all those lines perpendicular and even - although I used a template to help me.


Have you ever volunteered for something once, only to have it end up being your job forever? My church has a Holiday Boutique every year in November. About 4 years ago I was in charge of it and have made lots of items to sell each year. Last year a good friend of mine was in charge and I wanted to make sure she had a successful one, so I made over 100 ornaments for it. All the money goes to various charities - battered women's shelter, etc. so it's all for a good cause. Most of my ornaments involved stitching of only the simplest kind - a little SRE and some blanket/buttonhole stitching around a felt ornament, for instance. It was a way for me to be creative and have my creations DO something, not just sit in a closet somewhere. The market for these items was very limited though; items over $20 never sell well and cute items fared better than sophisticated ones. Well this year I share the responsibility with 3 other women. And this year all I want to do is CQ! Now that I've gotten back into it, thanks to Sharon B (and her inaminuteago blog) I feel so much like I've found my niche. But I feel like I will always be expected to make tons of stuff for the boutique. I get so involved in Oct/Nov with the Boutique that my garden is neglected (and looks it) and life is just sort of putting out fires. I, too would like to take Sharon's encrusted class, but I wouldn't be able to do it justice if I signed up just before the Boutique. Sigh....live and learn, I guess. I'm not the kind of person to sign up for something and then not do it, but I am just sooooo jazzed about CQ! Feeling selfish and guilty at the same time......

Saturday, August 19, 2006

Fiber Fest '06 (Photo-heavy)

Well I went to the Fiber Fest in Santa Monica today!

It was smaller than I expected; I've been to bead shows that were much larger at the same venue. But there was good stuff to be seen and bought, none the less.
There were wonderful quilts on exhibit. I've included a few pix of them here:
This is a combination quilt, with CQ around the more traditional applique blocks.

I took a couple of close ups of the CQ embroidery; see below:


Quilting Arts Magazine had an exihibit of ATCs. They were all so varied - I can see why they are so intriguing - you can try a new technique in a small space - you're not risking much and may come out with something great! One of my favorite ATCs:


There were demos of spinning (with 2 live and fluffy alpacas) and lots of looms set up. There were women walking around wearing these long capes that were like CQ knitting. They belonged to a group that did free-form knitting and crochetting and these capes were big, colorful, sometimes fluffy, with big leaves hanging off the sides - they were wild. Here is a purse made by one of the free-form knitters. The picture just doesn't do it justice - it was fabulous!


I dyed this lace! You just paint on the dyes - I ended up buying the dyes - it is permanent on natural fabrics once it dries. She had absolutely wonderful laces.


I thought and hoped there would be more crazy quilts on display there, besides the one pictured above. That was the only one, but there were various others that were very interesting - I got a few pix of them:


I bought some very small buttons, and some glass leaves - perfect for a CQ seam. I also bought some "wire lace" - which is very fine wire knitted or woven into a tube. You can stretch out the sides of the tube and it will stay in that shape. You can also put a bead inside the tube, if you wanted to make a necklace, for instance. It's very strange and interesting. Thought I would experiment with it in a seam treatment. I also got some fibers meant for knitting - a very thin "braid" that is hand-dyed and is almost a very narrow rick-rack. I was very impressed with the hand-dyed rick-rack on some of the CQ blocks people have posted on flickr. So I want to try the dyes that I got for the lace on rick-rack. Now I just wonder if most rick-rick is cotton or polyester.

I was talking with some other women there who were disappointed there wasn't more CQ stuff for sale - like cigarette silks, threads, etc. I did buy some fabric-covered paper that you put in your inkjet printer so you can make your own "cigarette silks" by printing a photo or some clip art. This is something I want to try adding to a CQ block also. Well, all in all, it was a fun time - great inspiration, great sharing, new plans and dreams for CQ....

Wednesday, August 16, 2006

Day 7 & Fabulous Fiber Fest 2006


Here is my version of Day 7. (I think there was too much sun - the brown is a little washed out) See SharonB's Day 7 here. I'm so glad I bought those tiny sequins way back when. Those are red seed beads on top of the tiny gold sequins. The black fiber is a Rainbow Gallery tubular pantyhose-like fiber, woven through a backstitch. The bugle beads up the right side are one of my subtle seam treatments.

I'm so excited - this weekend is the Fabulous Fiber Fest and bead show in Santa Monica. I will be going on Saturday and can't wait. Anyone else in the area planning to attend?

Tuesday, August 15, 2006

Still Stitchin' along on CQ Kimono


Well, I've stitched a few more seams on my small kimono, but believe it or not, I wanted to downplay a couple of the seams, to keep the emphasis on the vertical lines of the kimono near the sleeves. Ever try to embellish in a subtle way? Kind of anti-CQ, really. So I''ve worked my way back to regular embellishing with this seam. I think I got way too small on this one; I had to use the little tiny super-magnified area on my magnifier, which can drive a person crazy.

Also, I've been surfing pix of embroidery & CQ - which can get so addicting you can spend all your time surfing instead of stitching....always trying to find that balance... Anyway, while surfing I came upon some beautiful pictures of over-the-top sequin embroidery from India. To see these, go to Sequins. And I'm sure SharonB has pointed to LindaB's work, but I am continually blown away every time I see her fabulous peacock wall hanging. Check it out at peacocks.
Happy Stitching!

Friday, August 11, 2006

Old Embroidery?


I was rooting through my closet in the back, through the clothes I rarely wear & came across this shirt I embroidered as a teenager. The chain stitches are only about an eighth of an inch long! I could never do this now - the old eyes just wouldn't be able to handle it. When I was 16, I used to embroider jeans patches. I would go with my mom to antique shows (she was a dealer) and put my patches in a basket on her table and charge - get this - one dollar each!

I wonder how old others were when they first began to stitch and who taught them. Anyone else still have some oldies-but-goodies?

Thursday, August 10, 2006

The White Rabbit

Like I said in a previous post, I'm busy with VBS this week, so I have no time to stitch the 100 Details. Just thought I'd post this pic of some silk embroidery I did. I used buttonhole twist for this, sometimes separating it into 3 strands, then ironing it and stitching with just one strand(!).

This is a button that's about 3" in diameter. I used to belong to a Button Collectors Club. I have a collection of beautiful antique buttons, some that were my Grandmothers. Sometimes people would ask me to embroider them a button with a certain picture, so they could have a whole set of, say peacock buttons. This was one I did for myself.....

Tuesday, August 08, 2006

Day 27of 100 Details


Here is my version of SharonB's Day 27 Although it was a challenge to marry red & turquoise, I really had fun with the many beads & sequins in this seam treatment. Sometimes I focus too much on getting it done and how much time it will take, instead of just enjoying the process. If it weren't for Sharon's inaminuteago, I wouldn't be as far as I am on this project....

This week I'm helping out with Vacation Bible School, so I won't be able to stitch much CQ, but will try to send out some eye candy every day or two. (The first graders are sooo cute!)

Saturday, August 05, 2006

Memories of my mother & some SRE

One Christmas many years ago, my mom and I both gave each other the same gift for Christmas - Judith Montano's Crazy Quilt Odyssey book. It was so fun and so funny. I don't remember how I learned to embroider, but I was doing it as a teenager - I think I might have been self-taught. My mother didn't teach me, rather I taught her. At one time she was sentenced to 6 months of bedrest because of an enlarged heart. During that time I flew back to Ohio to cook her some meals and help care for her. While I was there, I taught her embroidery. She was always very creative and talented - she won countless awards for her sewing and her Japanese flower arrangements. She would cut off every bud except one on a dahlia, then when that one bloomed it would be a fabulous flower.

She took to embroidery like a kitten to milk. When you're laid up for 6 months, what more fun could there be than to have the mailman delivering weekly packages of fun threads and fibers? Since SharonB's inaminuteago blog got me back on the CQ track, I got out her CQ squares and have been thinking a lot about her. She died about 14 years ago and had 16 squares - some finished, most not. One interesting thing she put on one of the squares was a tombstone with her mother's initials and lifetime dates. I wonder if I'll eventually add one for her.

After she died, I was depressed for about 2 years. I eventually did this embroidery of her as a young woman walking through heaven. For her, I thought, heaven would be very flowery. And she could go back to being a younger woman, walking through the garden of Eden. Her name was June.

Well here she is... She is walking on some antique kimono fabric that I inlaid into the brocade fabric, then embroidered over the seam with all kinds of flowers. You can see close-ups of the stitching if you click on my flickr pix on the right side bar. The pix have descriptions of some of the stitches I used.

Wednesday, August 02, 2006

Day 27 and a half?


I started out intending to do the beaded Cretan stitch in SharonB's Day 34, but my Cretan stitch was too small to sport beads next to it, and since the olive fabric has those flowers in it, I couldn't resist using my flower beads on the red side. I must admit, when I bought the beads, I wondered why I would ever want black flowers. But here I am using them and totally happy. One of my next seams is red next to turquoise - am wondering how I will wed those two disparate colors.